

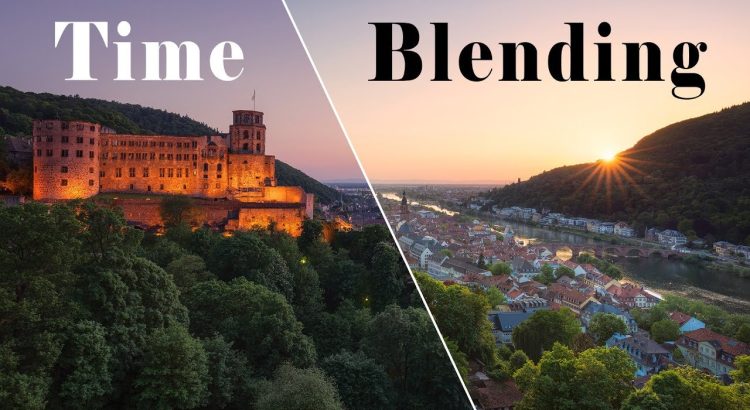
Photography is no longer confined to freezing a single moment in time—it has become a medium for expressing motion, emotion, and the flow of life itself. Among the most innovative techniques redefining the modern visual narrative is Cinematic Time-Blending. This approach goes beyond traditional long exposure and composite methods, blending multiple moments into one visually cohesive image that captures the evolution of light, time, and atmosphere.
What is Cinematic Time-Blending Photography?
Cinematic Time-Blending is a sophisticated photographic technique where several exposures captured over time are combined into one seamless image. Unlike a typical long exposure that merges all motion into a uniform blur, this method allows photographers to selectively merge different timeframes, maintaining both movement and clarity.
In practice, a photographer might capture a series of images over minutes or hours—from golden hour to twilight—and blend them to reveal the transformation of the environment. The result is an image that encapsulates the transition of time, offering both storytelling depth and visual impact.
This technique has become popular among landscape, architectural, and fine art photographers who want to depict not just a scene, but its life and progression.
The Philosophy Behind Time-Blending
At its core, time-blending is about exploring temporal storytelling. Instead of presenting a frozen instant, it narrates a passage of time in a single frame. It challenges the conventional perception of photography as a static medium and turns it into something fluid—almost cinematic.
This approach aligns with the emotional power of cinema, where light shifts, shadows evolve, and colors transform to convey mood. Through time-blending, photographers can replicate this dynamic storytelling without the constraints of video.
The essence lies in intentionality—deciding which moments to merge and which to exclude. This makes time-blending not just a technical exercise, but a philosophical statement about how we perceive and represent time itself.
Tools and Techniques for Mastering Cinematic Time-Blending
Achieving a polished time-blended image demands both creative foresight and technical control. Below are the essential components to execute this technique effectively.
1. Equipment Essentials
-
Camera with Manual Controls: A DSLR or mirrorless camera capable of manual exposure and RAW shooting is crucial.
-
Tripod: Stability is non-negotiable, as even minor shifts can complicate the blending process.
-
Intervalometer or Remote Trigger: Enables consistent interval shooting without camera shake.
-
Neutral Density (ND) Filters: Useful for controlling exposure in daylight while extending shutter speed.
2. Planning the Shoot
Pre-visualization is the cornerstone of successful time-blending. Photographers must anticipate how light will change over time and identify the key moments to capture. For example:
-
A skyline transitioning from sunset to twilight.
-
Ocean waves reflecting varying light hues.
-
Traffic trails forming dynamic patterns as night falls.
Consider using weather and sun-tracking apps to plan the timing precisely.
3. Capturing the Sequence
Shoot in manual mode to maintain consistent exposure settings throughout the sequence. Varying light intensity can be managed later in post-processing, but consistency in aperture and framing ensures a smoother blend.
Take multiple shots over a span of time, ideally with minimal interruptions between frames. Avoid moving the camera or tripod, as alignment is critical for post-processing accuracy.
4. Post-Processing Workflow
The magic of cinematic time-blending comes alive during editing. Here’s a step-by-step workflow:
-
Select Your Frames: Choose exposures that represent distinct time or light transitions.
-
Align Images: Import them into Photoshop or Lightroom and ensure perfect alignment.
-
Mask and Blend: Use layer masks to reveal portions of each frame. This allows you to decide which areas represent specific times of day.
-
Color Grading: Apply cinematic tones and contrast adjustments to maintain visual harmony.
-
Refine Details: Remove inconsistencies, balance light transitions, and fine-tune highlights and shadows.
This meticulous process can take hours, but the results are stunning—each image feels like a visual symphony of time.
Creative Applications of Cinematic Time-Blending
This technique’s versatility allows it to thrive across multiple photography genres.
1. Landscape Photography
Imagine a single photograph capturing sunrise, mid-day, and sunset over the same landscape. The color palette evolves from cool tones to warm golden hues, presenting the entire life cycle of a day in one frame.
2. Urban and Architectural Photography
Cinematic time-blending beautifully showcases cityscapes as they transition from daylight to the illuminated glow of night. It reveals the pulse of a city—its movement, rhythm, and architectural evolution throughout the day.
3. Fine Art and Conceptual Photography
For fine art photographers, this technique provides endless creative opportunities. By merging different times, moods, and lighting conditions, artists can create surreal imagery that transcends realism and delves into emotion and abstraction.
4. Event and Wedding Photography
While unconventional, time-blending can be used to narrate the emotional progression of an event. Imagine a wedding photo that transitions from the golden ceremony light to the candlelit reception ambiance—all within one elegant image.
The Emotional Impact of Time-Blended Images
Beyond its technical brilliance, time-blending holds immense emotional resonance. The subtle shift in light can symbolize transformation, continuity, or nostalgia. Each blended image becomes a metaphor for change—a visual poem about moments that coexist yet never overlap in real life.
For viewers, these images evoke awe because they mirror how memory works: fragmented, layered, and rich in temporal complexity.
Challenges and How to Overcome Them
Cinematic time-blending, while rewarding, poses several challenges:
-
Alignment Issues: Even minor camera movement can disrupt the blend. Solution: use a stable tripod and avoid touching the setup.
-
Light Variations: Rapid lighting changes can cause harsh transitions. Solution: shoot RAW and maintain consistent exposure to allow for smooth blending.
-
Time Management: Capturing multiple frames over long durations demands patience. Solution: use automated interval shooting and plan your sequence meticulously.
Overcoming these hurdles requires both discipline and artistic vision, but mastering them leads to results that few photographers can replicate.
Elevating Your Visual Storytelling
Cinematic Time-Blending isn’t just a technique—it’s a storytelling revolution. By controlling the flow of time and light, photographers can create images that resonate deeply with audiences accustomed to motion and narrative. It bridges the gap between photography and cinema, allowing still images to breathe, evolve, and live within a single frame.
To truly excel, photographers must move beyond technical perfection and focus on intentional storytelling—deciding not only how to blend time, but why. When done with purpose, this technique transforms photography into something profoundly cinematic and emotionally immersive.
Frequently Asked Questions (FAQ)
1. How does time-blending differ from HDR photography?
HDR focuses on combining exposures of varying brightness to balance light, while time-blending merges exposures from different times to depict motion or transition.
2. Can I use this technique with handheld shots?
It’s possible but not recommended. Even minor hand movement complicates alignment and can cause visible blending artifacts.
3. What software is best for time-blending?
Adobe Photoshop is the most popular due to its advanced masking and layering capabilities, though Luminar and Affinity Photo also work well.
4. How long should the time interval be between shots?
It depends on the scene. For fast-moving elements like clouds or water, short intervals (10–30 seconds) work best. For changing light conditions, longer intervals (5–10 minutes) are ideal.
5. Can this be done with smartphone cameras?
While technically possible using manual or interval shooting apps, achieving professional-quality results requires a full-frame or mirrorless camera.
6. How do I prevent ghosting effects in moving subjects?
Use selective masking and layer opacity to blend only portions of moving elements while preserving clarity in the rest of the frame.
7. Is time-blending suitable for commercial projects?
Absolutely. Many brands use time-blending for advertising architecture, travel destinations, or products where showcasing the passage of time enhances visual appeal.